Monday, February 17, 2014

Herringbone Baby Quilt


This post is about my latest project, the Herringbone baby quilt. I spotted the pattern on pinterest (here) and absolutely adored it. However there was no pattern or tutorial or really anything that helped me know how to make it. I've never quilted before, so there was a lot of trial and error involved since I didn't have the pattern but I think the end result was satisfying enough.

I'm so much of a novice quilter that I didn't even know what the right dimensions for a baby quilt were...Google to the rescue! The general consensus for a good sized baby quilt was somewhere around 40x50. I then did a lot of math (not my strongsuit) to try and figure out how many squares I would need and how many yards of fabric I should get...it was a long and complicated process that I'm still not sure I knew what I needed by the end of it. I ended up with 1 yard of Cream cotton (40"x36") and 2.5 yards of Gray cotton (40"x90"). I got a cut of batting that was a yard and a half (40"x54") and two packages of blue double fold bias tape (??? yards).

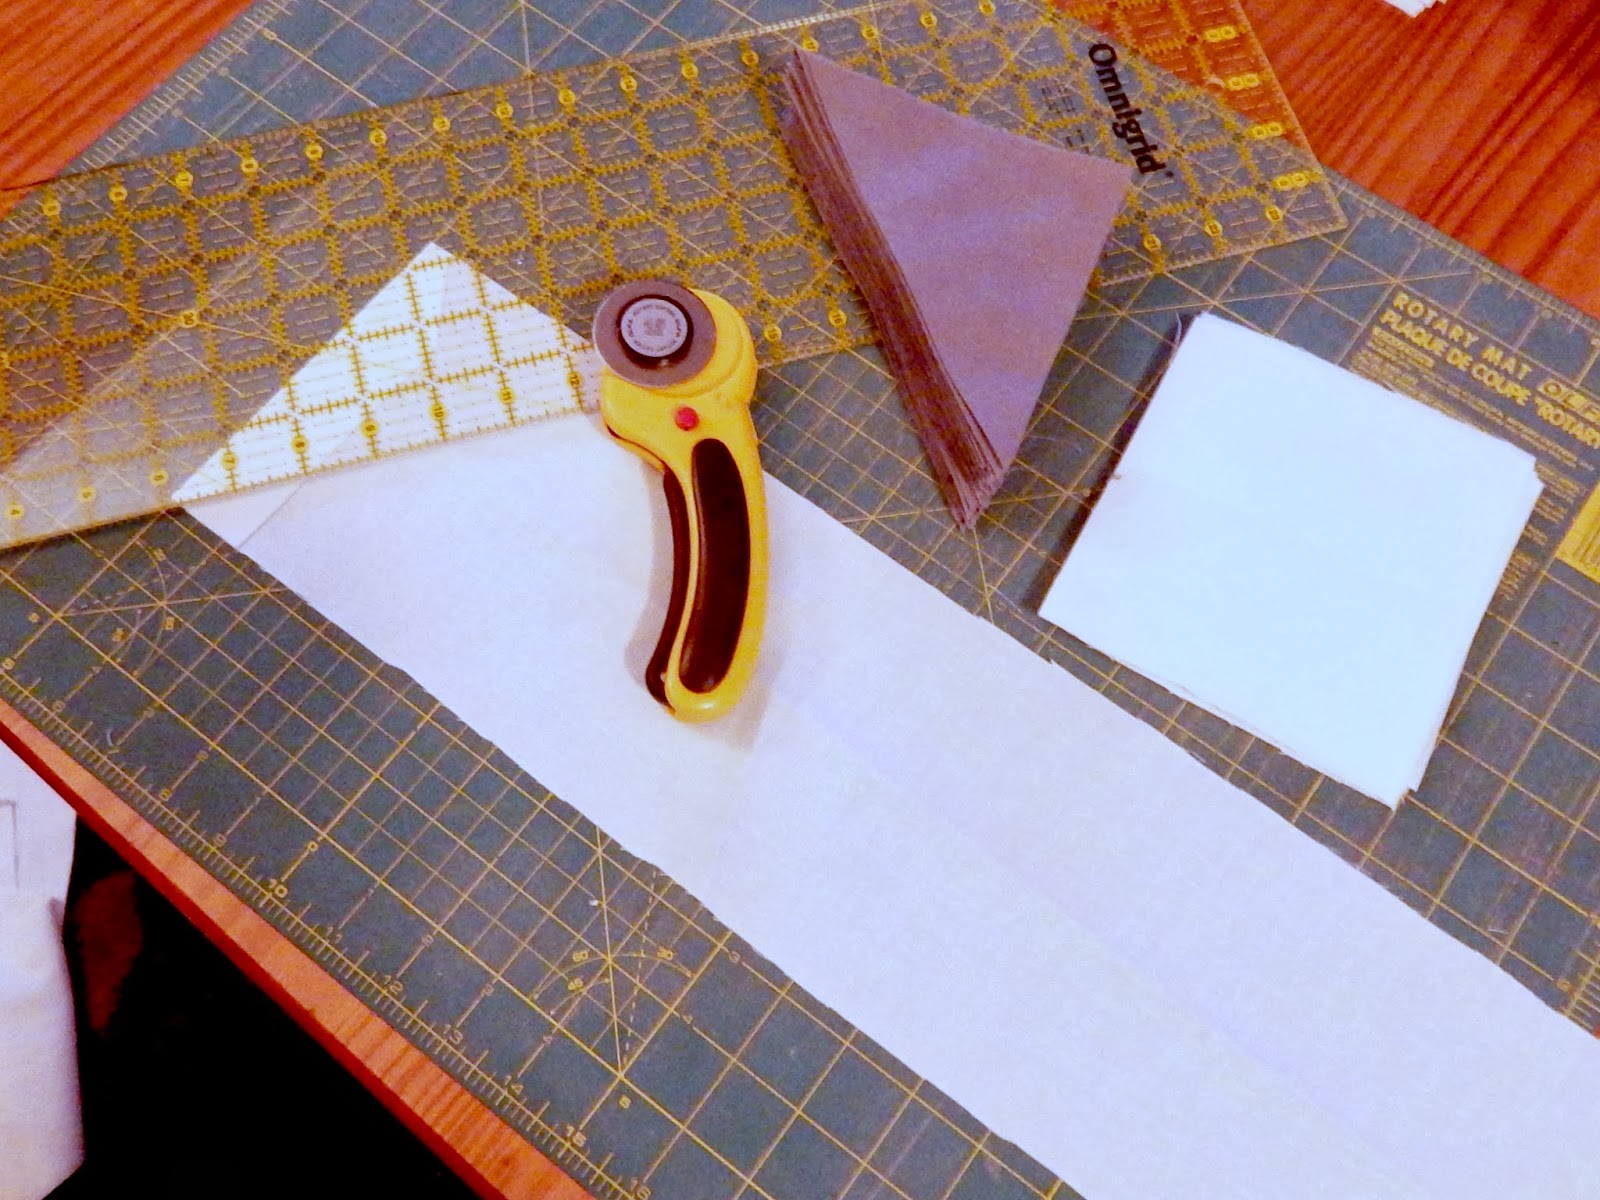
First I made sure I had enough of the Gray fabric saved for the backing and cut that off of my Gray fabric block (40x50).I cut the Cream and Gray fabrics into 5.5 wide strips by however wide the fabric was (40" I think) and then cut those into 40 (per color) 5.5" squares. Next I halved all of the squares diagonally making triangles. I ended up with 80 triangles of each color. (This got me into a little trouble because apparently my math was a little off and once sewn together the quilt as a whole was about 2" short on every side so I added a 2" gray border). You can figure out your math based on how big you want your quilt...and whatever you do, don't ask me to do your math for you! Anywho...I sewed each triangle to a triangle of the opposite color with a 1/4" seam allowance and then ironed open all of the seams. This gave me 80 bi-colored squares. (I did not have very much Cream fabric leftover, maybe two extra squares - so if you want to buy more of that for insurance you can).


(It gets easier after this...)

I laid out all my squares in the herringbone pattern on my batting and backing that was laid on the floor. Then I started sewing the squares together in rows (from right to left but it really doesn't matter as long as you get strips of squares sewn together and are able to sew them to the next row) Make sure you iron all of your seams open! This was by far the slowest most tedious part for me. (I also had to add my 2" border...because I'm bad at math...).


Once I had all the squares and rows sewn and the borders put on a pinned my batting, backing and top piece all together. And went to work quilting. After I'd gotten a few rows started and was very frustrated because I was having to shove mounds of fabric through my machine which was making for very crooked lines my Grandma told me that I should start from the middle...(good idea Grandma!). She also told me that my batting was really thick...*sigh* learned the hard way I guess...anyway, my method of quilting was to run the edge of my presser foot against the seam and my needle was positioned farthest away from the seam. Something like a 1/4" quilting line on either side of the seam.

My last step was the binding. I found a good tutorial on youtube that I used to know how to do it. I followed the tutorial for the front steps and then hand stitched the backside of the binding so that I could be sure that it was neat. Yes...I learned quilting from the internet. Pathetic I know. If I do any future quilts I promise I will find someone that actually knows what they're doing to tell me how to do things.


This was just one big adventure in quilting for me! I'm sure there are many great quilters out there who will be able to help you better understand how this quilt should be made, so go out and find them! I'll just be over here trying to find someone to tutor me in math again....


Friday, November 15, 2013

Baby Burp Cloths

This post has probably done about billion times in a billion different ways...but, hey!, why not another one??

This is probably the easiest, fastest and (could be) cheapest baby projects ever. You can make them all fancy if you really want to with ribbons and trims. But I mean...the kid is puking on them...I think functional is more important since you're going to be washing them every two seconds.

My supplies were a 1/8 yard of two different sale fabrics at walmart (a whopping $0.50 cents worth...) and a package of tri-fold diaper inserts. I'm pretty sure I could have found those cheaper, but at my Walmart selection is limited and they only sold packs of 10. Oh well...10 is a good amount. 

All I did was cut each of my strips of fabric into three pieces (I think it was probably 42 inches wide and 1/8 of a yard wide) for the bottom of each towel. I had to straighten out my prints...they were cut a little crooked. I ironed the edges over and just did a top stitch across the edges to apply them to the diaper inserts. Aaand done! Yay! It took me about 2 hours to make all 10...I was distracted by other things during that time, so it probably wouldn't take that long. 


My diaper bag has a Polka dot theme going on and I had made some little quilted pouches for the inside because the bag itself is lacking in pockets. I took the same fabrics I'd used for the pouches and used them for 3 of the towels that will go into the diaper bag. At least I'll look organized...I didn't want the cloths to come unfolded and go all over the diaper bag so I made a little 'belt' for them to keep them together. 

(The Diaper Bag Pouches)


I may add some 'E's or a little animal silhouette later to my burp cloths, but for now I'm satisfied with the outcome. 


Wednesday, November 6, 2013

My Coffee Bar


Today I thought I'd write a little post on my coffee bar, one of my most favorite-est projects I've ever done. 
This story begins like many others...

Once upon a time there was a Pin. A pin of a lovely little idea of making a special place for all of your coffee stuff. Up until this point I had just put my coffeemaker on the counter which was so un-special and didn't express Alex and I's coffee love quite like I wanted to. When I saw my first coffee bar pin I knew that this is what our apartment needed. But it took me a long time to come up with how I wanted to do it.

I didn't have room or money for anything fancy. The original pin had a shelf with cup hooks from Hobby Lobby that was well out of my price range. So of course I searched coffee bars on pinterest but still didn't come up with much. I eventually decided that my small bookshelf that wasn't being used for anything in particular would work just fine for my base. I added a little scrapbook paper to the back of the upper shelf a while ago to give it a little color (I didn't do the bottom shelf because I had an aquarium down there at the time). Bookshelf = Check!

But the shelves were a whole different enchilada. 

I thought about buying shelves from Lowes or Walmart, but they just didn't have what I wanted (I searched for months...). So I recruited good ol' Dad. He is pretty handy with wood and since I had such a specific idea in my head of what I wanted it ended up being the easiest and cheapest alternative. We bought some shelf brackets from Lowes for around $5 a set and an 8x10 board. We measured and cut the wood but it was still lacking in something...so Dad pulled out his bevel tool and we beveled the outer edges of both shelves (or more accurately Dad beveled the edges...I just watched...and kept all of my fingers intact). I stained the shelves with a light color oak to match my table other natural wood furniture and stuck the brackets on. Ta-da! Shelves for about $10 a piece and just the way I wanted them. 


Next was the cup hook dilemma. I really wanted cup hooks, but didn't want to spend the money (are you picking up on a theme here...?). So I came up with about 15 different methods for hanging cups from my coffee bar and didn't like a single one. But then...I found another coffee bar pin. One that used a curtain rod for mugs. Brilliant! I went to Walmart and found a $6 curtain rod that was attractive looking and found some shower curtain hooks that were the 'S' shape. I spent about $9 on the shower hooks but I only used four for this project and was able to use the rest in a different project. 


In the end I think my total project cost was about $30 (Not including the decor on the shelves...). Not too shabby!


Friday, October 25, 2013

Baby Clothes

I just love baby clothes. 

They're so cute and tiny, they're basically doll clothes! Since we found out we're expecting I have been obsessed with baby clothes. I regularly visit my favorite sites in search of the cutest baby clothes I can find. My Polyvore account has been flooded with baby clothes, my secret Pinterest boards are full of them. I just can't help myself! My favorite kinds are the little people clothes, like little 3 piece suit sets or old man cardigans for boys and dresses and little ballet flats for girls. We're going to go bankrupt from baby clothes.

I thought I'd share a few of my favorite finds via my Polyvore account (I know...all of you people that actually use Polyvore for it's intended purpose are cringing at my baby obsession...).

Seriously. How cute can you get?!


Nursery Projects #2: Ship Wall Art

Alex and I are regulars at our local Goodwill. He searches for books while a comb each shelf of the random decor items for hidden treasures. We don't find things very often, because let's face it...most people's junk is not our treasure. But a few weeks back we were looking and stumbled upon some metal art that was pretty cool and would definitely fit into our nursery themes. 

The first thing I found was a set of copper wall hooks that were shaped like bows...super cute for a little girl nursery! You can see how I upcycled them here.

Then Alex and I discovered a real treasure - a large metal-worked ship! It was ugly...the color was this icky copper with like burnt edges and it was all dirty and cob-webby, but we saw the potential. Especially for a boy nursery that is going to be storybook/Narnia themed!

So we brought it home and it sat in my corner of the office for a while...a week went by, and then a month and I still didn't know what I was going to do with it to make it look as cool as I knew it could. 

Well, we were painting our changing table (see it here) and it came to me - paint the ship the same color gray! That way if I ever get the chance to have a real live nursery I can hang it above the changing table and it will look all cool and modern and stuff. 

I was afraid the paint wouldn't take to the metal, but it actually worked really well and only needed two coats. 


Thursday, October 24, 2013

A Stocking for Flint


Because I have crazy pregnancy hormones that make my maternal instincts go through the roof - I find myself babying our cat more than usual...which really isn't saying much because I babied him a lot before...


I saw a pin on pinterest (where most of my ideas come from...) for these adorable pet Christmas stockings that were shaped like a paw and I loved it so much that I decided to try it. Right then. It was like 10 o'clock at night...


I printed off a paw print silhouette, because I realize that my drawing skills are lacking and I didn't want to attempt drawing a paw. I cut out each shape and used it as my pattern for the little paw applique pieces. I used the cutouts to get a general shape for the stocking as well, AND I used the paper that the cutouts came from as my layout guide. 


I had some burlap and tan fabric leftover from a previous project to use for the main part of the stocking, and dug out some black cotton that I had in my scrap bin. I also grabbed some cute polka dot green fabric scraps that caught my eye for around the top of the stocking and got to work. I added a little red polka dot ribbon that I had on hand for the loop and a little bow (he might not appreciate this feminine touch...but he's a cat and I thought it was cute...so he can deal with it).


Nursery Projects #1: A New (Old) Changing Table


About a year ago some friends of ours were getting rid of a changing table. They asked if we'd like to have it we said "sure!", thinking we'd just put it in the basement and use it as extra storage shelving. So we've had this semi-ugly changing table sitting in our basement being used for everything but it's intended purpose. 

It looked something like a changing table you could get at ikea (it may even be from ikea...I'm not entirely sure...Just basic blonde wood and white shelves (very dirty, almost gray, white shelves...). 

In light of our recent baby news we have been trying to put a nursery together as cheaply as possible, and since we'll be moving a few months after baby is born, we won't have an actual nursery here (sad day...). But I've been researching things to put in a nursery, such as cribs and bassinets and changing tables and suddenly I remembered that I have a changing table! 

But it was ugly...

Alex and I decided to make a weekend project out of it. It took much debate on what color to paint it since our crib is a dark wood color and we weren't sure of gender. Couldn't just paint it pink or blue...We finally decided on gray, since I wanted that to be a main color in either nursery. We went to Walmart (cause we're poor college students...) and got some gray paint from the nice man in the paint section, got some paintbrushes at the Restore and went to work!

Unfortunately we live in Wisconsin where the temperature drops considerably for no reason in October...and it was going to be too cold to paint it outside if we didn't do it that day. So we set up a painting station in our landlords garage (he's really nice...) and got to work. 

After we finished painting both Alex and I decided that the shelves were beyond hope...paint wasn't sticking and the dirty white and particle board just wasn't working for me. I got some shelf liner at the Dollar Tree that was the color of dark wood and stuck it on the shelves. I also picked up some fabric storage baskets from Walmart  for the top shelf and added some little, faux chalkboard labels to the little label pocket just to make it look like I know what I'm doing...I really have no idea what I'm actually going to put in them, but I'm sure I'll find plenty of things when the time comes. 

I think in the end we ended up spending about $25 on the whole project. Not bad! I have one more project for an extra storage basket for the bottom shelf, but I have to wait until the next trip to Walmart for my supplies (you have to learn to be patient when you live half an hour from the nearest Walmart!).

Anyways...Here it is!